I saw this great How To on Burdastyle for a Tulle Tutu and had to try it.
http://www.burdastyle.com/techniques/how-to-make-a-tulle-skirt
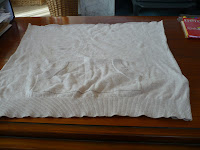
It's a simple method- you use a stretchy mini skirt, or make a simple one, then sew the Tulle (net stuff) all around. I didn't have a mini skirt but when I searched for any stretchy fabric I had I found the left overs from another project. I had cut the sleeves off a hoodie to make some sleeves (see blog post from a few months ago), and had the body of the hoodie left over. I was wondering what I could do with it, since it seemed a shame to waste it but it had an unwashable stain on the front- so turning it into a skirt covered in Tulle seemed perfect.

 Obviously I pulled the top on as a skirt to check it fitted me, and it did although it was quite loose in the waist. So the first thing I did was to take in the waist, and then add elastic to it.

My elastic skills still fail to emerge and the elastic got twisted and moves around inside the wait band but it'll do. :)My next task was somewhat more labourious- according to the How To I needed 8yards (sigh did no one but me go metric?) of tulle, cut into 9inch by one yard strips. I have plenty of tulle (another reason for making the skirt) which I bought cheaply online ages ago, in a variety of colours. With the skirt being beige/cream I went for a cream and orange combination fo tulle.

 My tulle is quite stiff and large holed, for a future project I might like to use a more delicate form of it. Also the colours I have (not chosen by me, I bought a pre packaged pack) are quite bright and gaudy, although I do have some gold which is fancy. To cut the tulle I first needed to cut it into 4 yards by 54" pieces (which is the size of fabric the How To lady had) before cutting those pieces into 9"strips, then cutting the strips into quarters. I could use my ruler for the 9" strips, but my tape measure is all cms baby. So I estimated the cm equivalent for the bigger sizes, the process is defo not a super accurate one but it doesnt really matter.
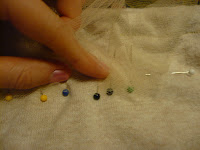
 One I had all my strips it was time to pin them to the skirt. Four of the strips make one layer around the skirt (so I guess if you are a bigger size you would want longer strips?), but one strip is much longer than one quarter of the skirt because they are rooched (I don't know how to spell that!). So the side seams split the skirt in half, and I put a pin in the front and back to split it into quarters (just so I could see where I would be pining the tulle). The way I chose to pin it was to pin one end of the tulle strip to the side seam, and the other end to the middle pin. The I found the middle of the tulle and pin it to the middle of the skirt quarter, then I found the middle of the skirt eighth and pinned the tulle to that, and so on. I started at the top of the skirt and pinned the tulle pointing towards the top of the skirt- so that after sewing it would fold over nicely hiding the stiching and adding more poof.

 As you add more layers it does get fiddlier to pin the tulle, mainly it's getting you hand underneath the fabric so you pin through it (don't do what I kept doing and pin the two sides of the skirt together doh). Also after you've added a few layers of tulle one end of the skirt will be significantly bigger and tullier than the other taking up half your table. I found it was also tricky to pin the tulle in a stright line, and it may have been benificial, although time consuming, to draw some lines on the fabric before I started sewing.
 By the time I'd finished I'd done 9 layers of tulle, and decided this was enough. Because of how I'd held it and flattened it when sewing the layers had got a bit scrunch so I'll need to sort them out, but I'm quite pleased really. Now just need an event!


http://www.burdastyle.com/techniques/how-to-make-a-tulle-skirt
It's a simple method- you use a stretchy mini skirt, or make a simple one, then sew the Tulle (net stuff) all around. I didn't have a mini skirt but when I searched for any stretchy fabric I had I found the left overs from another project. I had cut the sleeves off a hoodie to make some sleeves (see blog post from a few months ago), and had the body of the hoodie left over. I was wondering what I could do with it, since it seemed a shame to waste it but it had an unwashable stain on the front- so turning it into a skirt covered in Tulle seemed perfect.


My elastic skills still fail to emerge and the elastic got twisted and moves around inside the wait band but it'll do. :)My next task was somewhat more labourious- according to the How To I needed 8yards (sigh did no one but me go metric?) of tulle, cut into 9inch by one yard strips. I have plenty of tulle (another reason for making the skirt) which I bought cheaply online ages ago, in a variety of colours. With the skirt being beige/cream I went for a cream and orange combination fo tulle.

 My tulle is quite stiff and large holed, for a future project I might like to use a more delicate form of it. Also the colours I have (not chosen by me, I bought a pre packaged pack) are quite bright and gaudy, although I do have some gold which is fancy. To cut the tulle I first needed to cut it into 4 yards by 54" pieces (which is the size of fabric the How To lady had) before cutting those pieces into 9"strips, then cutting the strips into quarters. I could use my ruler for the 9" strips, but my tape measure is all cms baby. So I estimated the cm equivalent for the bigger sizes, the process is defo not a super accurate one but it doesnt really matter.
 One I had all my strips it was time to pin them to the skirt. Four of the strips make one layer around the skirt (so I guess if you are a bigger size you would want longer strips?), but one strip is much longer than one quarter of the skirt because they are rooched (I don't know how to spell that!). So the side seams split the skirt in half, and I put a pin in the front and back to split it into quarters (just so I could see where I would be pining the tulle). The way I chose to pin it was to pin one end of the tulle strip to the side seam, and the other end to the middle pin. The I found the middle of the tulle and pin it to the middle of the skirt quarter, then I found the middle of the skirt eighth and pinned the tulle to that, and so on. I started at the top of the skirt and pinned the tulle pointing towards the top of the skirt- so that after sewing it would fold over nicely hiding the stiching and adding more poof.
 As you add more layers it does get fiddlier to pin the tulle, mainly it's getting you hand underneath the fabric so you pin through it (don't do what I kept doing and pin the two sides of the skirt together doh). Also after you've added a few layers of tulle one end of the skirt will be significantly bigger and tullier than the other taking up half your table. I found it was also tricky to pin the tulle in a stright line, and it may have been benificial, although time consuming, to draw some lines on the fabric before I started sewing.


No comments:
Post a Comment