
A while back I decided I needed a backpack for days when I went cycling- it didn't need to be very big just big enough to fit the essentials like keys, phone, purse, water bottle, jumper. So I scoured the internet and actual real shops and found nothing until I stumbled across an etsy shop. Looking at their backpacks I realised I could make my own fairly easily. And it was fairly easy but given the nature of making bags with linings (you make the bag inside out, with all the straps and hat not hidden inside when you sew) it required me to unpick and resew as I had put things in upsidedown and back to front.
The trick to making it yourself is getting all the bits in the right place in the right order (duh) but if you do it wrong you have to unpick and dig in to an inside out back to front bag and re do it. I made a new bag recently because my old one had some problems (the straps were too short, the bag was slightly too small, and there was no proper clips to fasten it) so I thought I'd document it for you all.
 Here is my pattern! It's super sophisticated as you can see but it's pretty much what you need.
Of course the size of the bag is up to you but these are the sizes I used.
You need:
Main pieces for the bag body x2 lining
x2 fabric
Strap pieces x2 lining
x2 fabric
Front flap piece x 1 lining
x1 fabric
Pockets x whatever fabric you want, I didn't put any into mine.
Tube for drawstring x 1lining (I didn't draw this but it needs to be about 5 cm wide and long enough to go all the way around the top of the backpack- my bag was about 34cm wide so I needed my my tube to be 68cm long).
Little straps for clips- x4 fabric (again not on my pattern but they should be the right width to fit your clips and the right length for your preference).
Toggles for the drawstring, and clipy things to fasten the backpack at the front.
Step 1. Cut out all the pieces- remember to add at least 1cm of seam allowance to every edge.
Step 2. Make the little straps for the clips- I had two clips so I got 4 pieces of fabric and sewed them into pairs. Then feed these through your clips and sew one half onto the front of your main bag (the fabric piece not the lining piece)


The trick to making it yourself is getting all the bits in the right place in the right order (duh) but if you do it wrong you have to unpick and dig in to an inside out back to front bag and re do it. I made a new bag recently because my old one had some problems (the straps were too short, the bag was slightly too small, and there was no proper clips to fasten it) so I thought I'd document it for you all.
Here is my pattern! It's super sophisticated as you can see but it's pretty much what you need. Of course the size of the bag is up to you but these are the sizes I used.
You need:
Main pieces for the bag body x2 lining
x2 fabric
Strap pieces x2 lining
x2 fabric
Front flap piece x 1 lining
x1 fabric
Pockets x whatever fabric you want, I didn't put any into mine.
Tube for drawstring x 1lining (I didn't draw this but it needs to be about 5 cm wide and long enough to go all the way around the top of the backpack- my bag was about 34cm wide so I needed my my tube to be 68cm long).
Little straps for clips- x4 fabric (again not on my pattern but they should be the right width to fit your clips and the right length for your preference).
Toggles for the drawstring, and clipy things to fasten the backpack at the front.
Step 1. Cut out all the pieces- remember to add at least 1cm of seam allowance to every edge.
Step 2. Make the little straps for the clips- I had two clips so I got 4 pieces of fabric and sewed them into pairs. Then feed these through your clips and sew one half onto the front of your main bag (the fabric piece not the lining piece)
Step Three- Also on the front bag piece add your pockets or anything else you want to put on the front, you wont have chance later on. Don't worry about the back of the fabric all the threads will be hidden by the lining.
Step Four- Make the front flap, this is the flap which will close over the top of the bag and make it more secure. Put the fabric flap piece and lining flap piece and pin them right sides together along the side seams. Take the other halves of the clips and attach the little straps to them then pins those in the bottom edge inbetween the fabric and the lining- with the clips hidden inside. Then sew around the three pinned seams and turn right way round. And if you found that instruction confusing you wont like the subsequent ones!
Step five- Take the shoulder straps pieces right sides together and sew the lining and the fabric shoulder pieces along the long side seams- leave the small seams open. Then turn the straps right way round .
Step six- Take the main bag body fabric pieces right sides together and sew along the long side seams, and turn the bag right way round. Then sew the lining pieces in the same way but keep this inside out. Place the fabric bag inside the lining bag.
Step seven- Take your draw string tube fold it in half (wrong sides together and fold it width ways so it is still long and thing) and iron or pin in place.
Step eight- Ok- listen carefully! Take your bag body and along the top edge (it doesn't make a difference which is top and which is bottom at this point so pick an open end). Inbetween the lining and the bag place the straps (near the side seams, and with the main fabric facing up), the front flap (with the main fabric facing down) the drawstring tube (make sure the centre of the bag matches the half way point of the tube). You should end up with a sandwich that goes bag, strap, flap, tube, lining. But all of the pieces should be hidden inside the bag.
Step nine- Turn over the bag and carry on pinning in the draw string tube in the front of the bag (but still inbetween the bag and lining. Now sew along the top of the bag going through all the layers attaching the bag and lining.
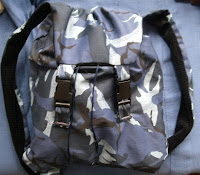
Step ten- Now turn the bag around so you are dealing with the bottom open end of the bag. Reach in and find the shoulder straps and feed the ends of the them into the bottom of the fabric bag and pin in place. Be careful that the straps aren't twisted. The bag is currently sitting inside the lining- but you need access to the bag to sew the bottom seam. So holding the bag with the top edge you just sewed at the top reach in and pull out the bag leaving the lining behind. You now have the bag right sides together including the straps pinned in place. Sew along this seam. Place the bag back inside the lining. It should look something like this except without the straps showing at the bottom because I initially made a mistake.
Step eleven- You should still have a hole in the bottom seam of the lining. Reach your hand into through this hole and pull through it all of the rest of the bag. Check the bag over and that everythings in the right place then sew the hole in the lining as neatly as possible. Then place the lining inside the bag.
Step twelve- The last step is to thread the drawstring and add toggles.


No comments:
Post a Comment